Write a REPL using GPT-3 and Go
This blog post will discuss how to use the OpenAI Chat API in Golang. For this purpose we will create a simple REPL (Read-Eval-Print-Loop) that will use the GPT-3 API to generate the responses.
Why Programmatic AI Integration Matters
Programmatically interacting with AI chatbots like GPT-3 offers significant advantages over using web interfaces:
Automation & Scalability: Integrate AI capabilities directly into your applications, allowing batch processing and automation of repetitive tasks. You can process thousands of requests without manual intervention.
Custom Workflows: Build tailored solutions that combine AI responses with business logic, databases, and other services. This enables sophisticated use cases like automated content generation, code review assistance, and intelligent routing systems.
Cost Efficiency: Direct API access often provides better pricing than paying for individual subscriptions, especially when dealing with high-volume requests.
Data Control: Keep sensitive data within your own infrastructure instead of transmitting it through web browsers or third-party services.
Integration Flexibility: Seamlessly embed AI capabilities into existing systems, tools, and pipelines without forcing users to adopt new interfaces.
Getting Started with OpenAI API in Go
To use the OpenAI Chat API in Golang, you must obtain an API key from the OpenAI Developer Portal. Once you have an API key, you can use the following steps to make requests to the API:
Create a new Golang project and install the OpenAI library:
$ go mod init github.com/yourname/yourproject
$ go get github.com/PullRequestInc/go-gpt3
The main function starts by reading in the OpenAI API key from the environment variable OPENAI_API_KEY. If the API key is not set, the program will exit with an error message.
	apiKey := os.Getenv("OPENAI_API_KEY")
	if apiKey == "" {
		log.Fatal("Missing API KEY")
	}
To obtain an OpenAI API key, you will need to sign up for an account on the OpenAI website (https://beta.openai.com/signup/). Once you have created an account and verified your email address, you can access your API key by visiting the API section of the OpenAI dashboard (https://beta.openai.com/docs/api-overview/getting-started).
Next, the program creates a new client using the gpt3.NewClient function, passing in the API key as an argument.
client := gpt3.NewClient(apiKey)
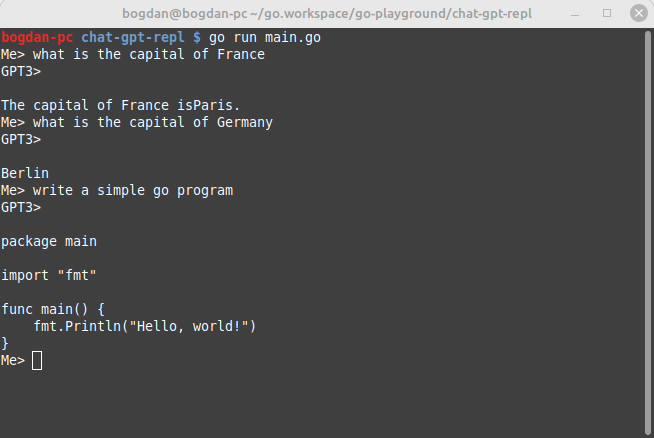
The program then enters a loop where it reads in a prompt from the user via the command line and passes it to the GPT-3 engine using the CompletionWithEngine function.
	reader := bufio.NewScanner(os.Stdin)
	fmt.Print("Me> ")
	for reader.Scan() {
		resp, err := client.CompletionWithEngine(context.Background(),
			"text-davinci-002",
			gpt3.CompletionRequest{
				Prompt:    []string{reader.Text()},
				MaxTokens: gpt3.IntPtr(maxTokens),
			})
		if err != nil {
			log.Fatalln(err)
		}
		fmt.Println("GPT3>", resp.Choices[0].Text)
		fmt.Print("Me> ")
	}
The function returns a CompletionResponse object, which contains the generated text in the Text field.
The generated text is then printed to the command line, and the loop continues until the user exits.
Best Practices for Production Deployments
When building production systems with AI integration, consider these important practices:
Error Handling: Always implement robust error handling for network failures and API rate limits. The example above demonstrates basic error checking, but production code should implement exponential backoff and retry logic.
Token Management: Monitor token usage to manage costs. The MaxTokens parameter controls response length and directly impacts pricing.
Rate Limiting: Implement client-side rate limiting to respect API quotas and prevent service disruptions.
Streaming Responses: For long-form content generation, consider using streaming endpoints to provide faster time-to-first-token for better user experience.
Security: Store API keys securely using environment variables or secret management systems. Never commit API keys to version control.
Conclusion
Building programmatic interfaces to AI systems empowers developers to create innovative applications that were previously impossible. Whether you’re automating content creation, building intelligent customer support systems, or enhancing your development tools with AI capabilities, the combination of Go’s performance and OpenAI’s powerful APIs provides a robust foundation.
The full source code for this program is available on GitHub.